This is the complete depth of field photography guide for 2025.
So if you’re looking to:
- Choose the best f-stop settings
- Master step-by-step camera technique
- Take sharper images
- Improve your compositions
Then you’ll love the actionable techniques in this step-by-step guide.
Let’s get started…
Table of Contents
Depth of Field Photography Video
Watch this video to learn the best f-stop settings to maximize depth of field and image sharpness.
Next, read the guide to dial in your camera technique.
Depth of Field Photography Basics
In photography, aperture diameter, determined by f-stop, controls two important factors:
- Depth of Field (DOF) determines the closest and farthest objects in an image, both of which are in focus. The entire image between these objects also maintains sharp focus.
- Amount of Light exposed to the image sensor, which controls the image brightness, rated in stops.
Mastering depth of field requires a basic understanding of f-stop, focal length, focus range, and camera lenses.
We will quickly cover these first.
What is Aperture in Photography?
The terms f-stop and aperture are often used interchangeably, this is incorrect.
- Aperture is the opening in the front of the lens where light enters the camera.
- F-stop is the ratio of lens focal length to aperture diameter.
F-stop is a dimensionless number, denoted by a hooked “ f ”, with an underlying number denoting the f-stop value.
f/2.8 and f/8 are two examples of common f-stop settings, where 2.8 & 8 are the f-stop values, respectively.
F-Stop = Lens Focal Length (mm) / Aperture Diameter (mm)
The aperture diameter is the straight distance across the widest part of the aperture.
The focal length of the lens determines your field of view (composition) and the magnification of the scene.
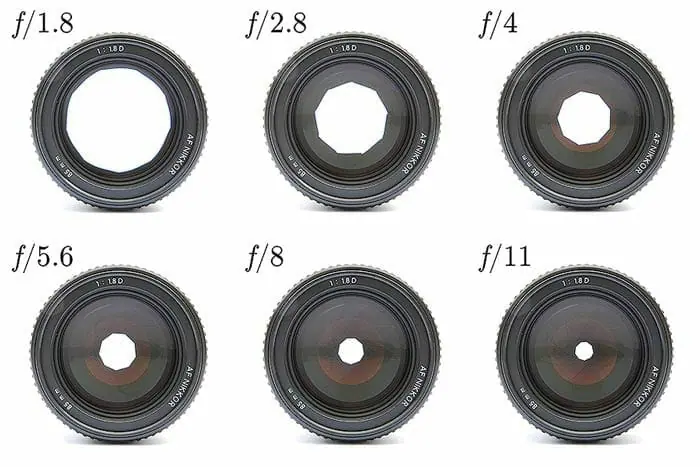
The graphic shows increasing f-stop values with decreasing aperture diameters.
Attribution – Wikipedia
If the lens focal length is 20mm and the aperture diameter is 10mm, then f-stop = 20mm/10mm = 2.
This is denoted as f/2.
The photographer controls the f-stop, which determines the depth of field and how much light enters the lens.
The larger the f-stop value, the less light enters the lens, over a set exposure time.
The smaller the f-stop value, the more light enters the lens, over a set exposure time.
What is Depth of Field in Photography?
Depth of Focus vs Depth of Field (DOF) – To clear up any confusion, these terms mean the same thing.
They can be used interchangeably with focus range and DOF.
Depth of field is defined as the distance between the closest and furthest objects within a composition, both of which are in focus.
All objects between the closest and furthest objects are also in focus.
By adjusting the f-stop, the photographer controls the depth of field.
- Smaller f-stop value = larger aperture diameter = smaller DOF
- Larger f-stop value = smaller aperture diameter = larger DOF
The following examples show small or shallow depth of field vs large or deep depth of field.
The first photo was taken at f/5.6 and the second was captured at f/16.
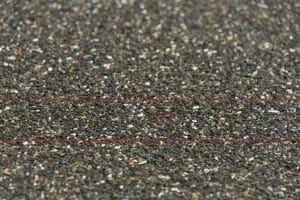 Photographed at f/5.6
The red lines show the closest and furthest objects that are in focus.
Notice how everything between these lines is also in focus.
The red box denotes the focal point within the image.
This is the location that I focused on to take the shots.
The focal point always lies within the focal range or depth of field.
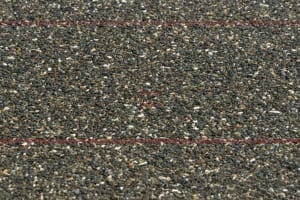
Photographed at f/16
In the images above, the focal point, denoted by the red box, stays at approximately the same location.
The depth of field or focus range extends beyond the focal point, as the f-stop increases from f/5.6 to f/16.
Here is another example of two landscape photos showing varying depths of field.
The first example below shows a deep also known as large depth of field.
Everything in the entire image, foreground to background is in focus.
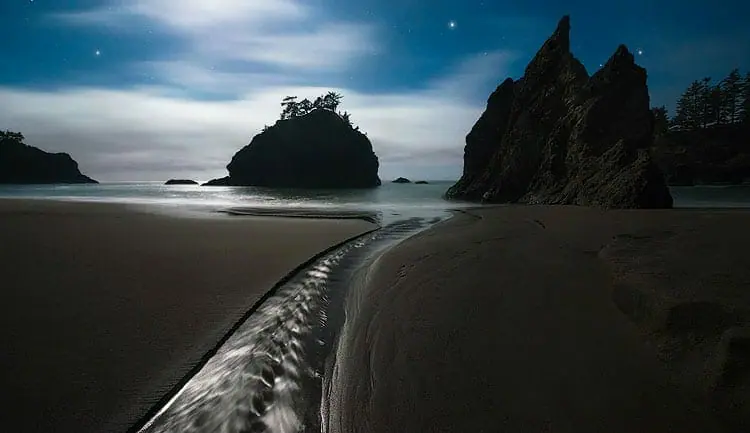
Large Depth of Field @ f/8
The second image shows a shallow depth of field example.
Only the subject is in focus, while the foreground and background are not in focus.
The focus range is very shallow providing a small depth of field.
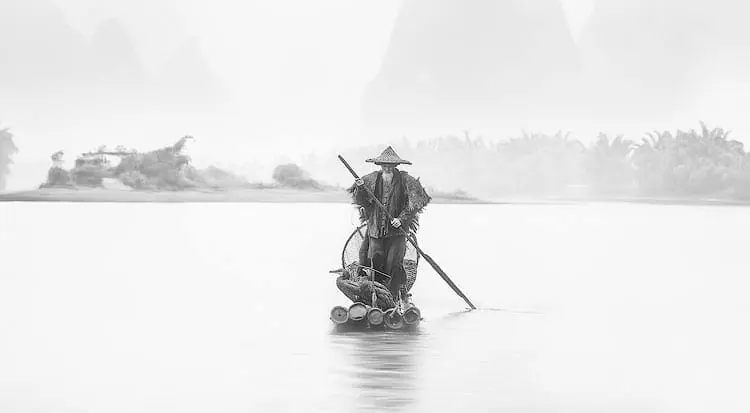
Shallow Depth of Field @ f/4
What is Focal Length in Photography?
The lens focal length, selected by the photographer, determines the field of view (FOV)
The field of view defines your composition.
It’s everything seen for a selected focal length.
The larger your focal length, the smaller the field of view becomes & vice versa.
Focal length also determines the depth of field, as we will cover below.
Example Images – Focal Length & Field of View
When the focal length increases, the field of view decreases, and the subjects in the image become magnified.
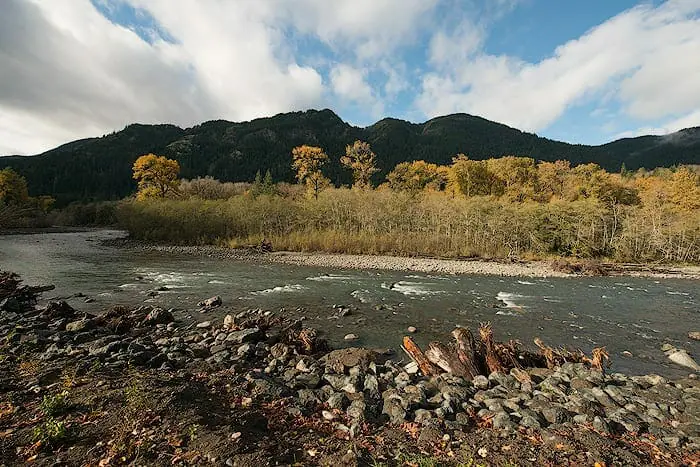
14mm Focal Length
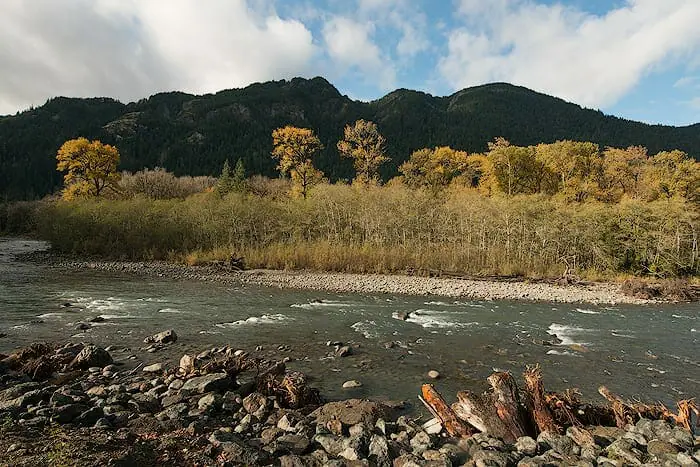
24mm Focal Length
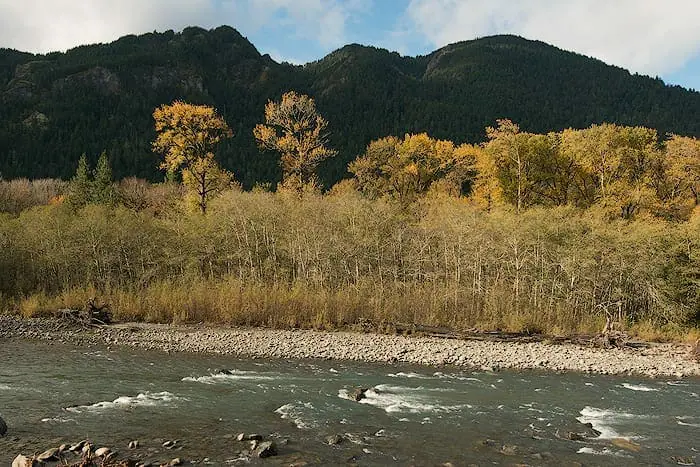
80mm Focal Length
Camera Lens Basics for Depth of Field
Prior to selecting the correct f-stop & focal length settings, producing the desired depth of field, the basics of a camera lens must be understood.
Different Types of Camera Lenses
Human vision is approximately 50mm focal length.
Focal lengths larger than approximately 50mm will magnify the composition.
Focal lengths less than 50mm are denoted as “wide-angle”.
- Wide Angle Lenses produce a field of view larger than our standard vision & usually range from 8mm to 35mm in focal length.
- Standard Lenses produce a field of view similar to our standard vision & usually range from 40mm to 60mm in focal length.
- Telephoto Lenses produce a field of view smaller than our standard vision & usually exceed 70mm in focal length.
Camera Lens Focal Lengths
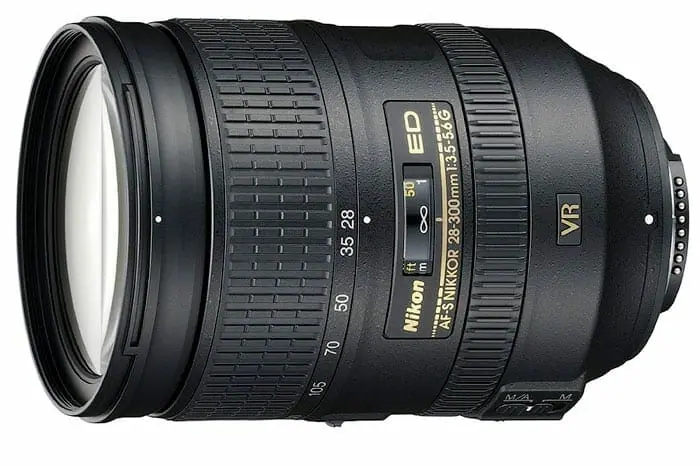
The 28-300mm lens shown in the graphic below has a focal length range of 28mm to 300mm.
This is denoted as a wide-angle telephoto lens since it covers above & below 50mm focal length.
The focal length range for this specific lens is labeled in gold letters as 28-300mm, seen just above the “AF-S NIKKOR” label.
The photographer can select any focal length, within the focal length range.
This is what determines the composition.
The white dot on the lens above shows the currently selected focal length of 28mm.
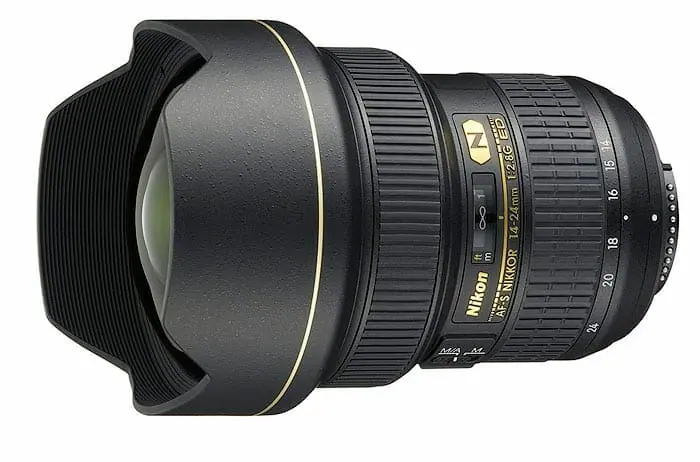
The 14-24mm lens, shown below, is known as a wide-angle lens.
It covers fields of view greater than what the human eye can see.
The smaller the focal length the “wider” the field of view.
Crop Factors & Focal Lengths
Cameras with crop factors above or below 1 change the field of view and focal length.
Using your camera’s crop factor an effective focal length can be calculated.
A full-frame sensor has a crop factor of 1.
A 28-300mm lens used on a 1.6 crop factor camera would have an effective focal length range of 45mm – 480mm, calculated as follows: ( 28mm X 1.6 ) – (300mm X 1.6 ).
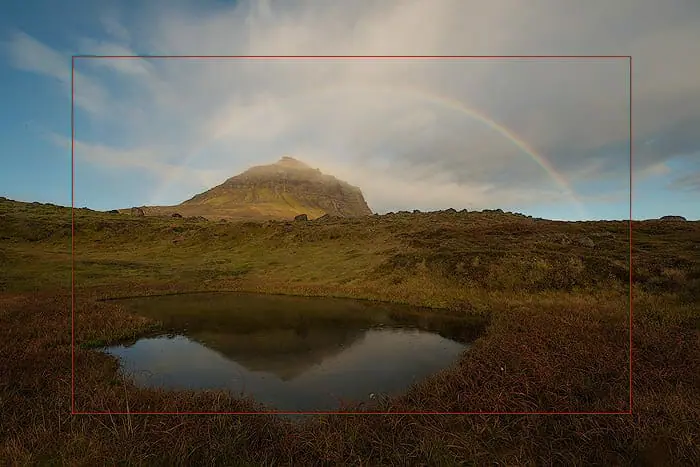
The following image was taken on a full-frame camera with a crop factor of 1.
The same image taken at 14mm on a 1.6 crop factor camera would look like it was taken on a 22mm lens (14 X 1.6)
The red box shows what this composition would look like on a 1.6 crop factor camera.
Camera Lens F-Stop Values
Each camera lens has a minimum f-stop value, or widest aperture diameter, in which it can operate for any given focal length.
Most lenses are designed so the minimum f-stop value increases as the focal length increases.
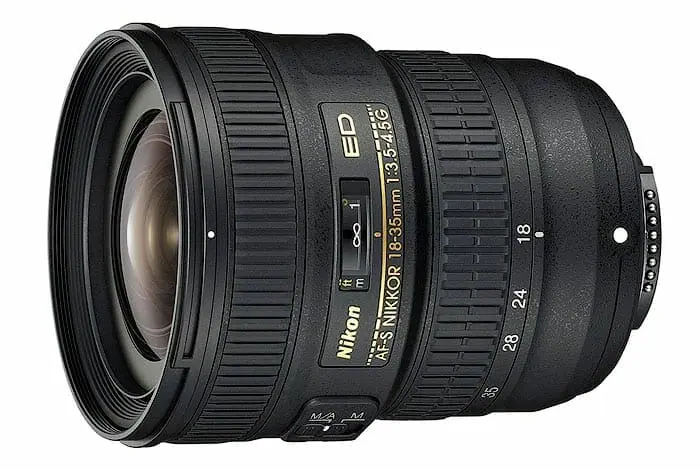
The lens label shows the focal length range to be 18-35mm in the example below.
The photographer can shoot at any focal length, in the range of 18-35mm, producing their desired field of view.
Following the focal length range is the minimum f-stop range of f/3.5 to f/4.5, noted on this lens and most others as 1:3.5-4.5.
The range of f/3.5 to f/4.5 provides the minimum f-stop values (widest aperture diameters), that this specific lens can maintain while shooting at the minimum and maximum focal lengths, respectively.
- For example, the minimum f-stop value this lens can maintain is f/3.5 while shooting at 18mm.
- As the focal length increases, from 18mm to 35mm, the minimum f-stop also increases, until it reaches f/4.5 at 35mm.
- All focal lengths between 18mm and 35mm will have minimum f-stop values ranging from f/3.5 to f/4.5.
You can always increase the f-stop to larger values.
The noted values are only the minimums.
Lens Speed, Explained
The lens speed refers to the minimum f-stop value a lens can shoot at for any focal length.
As the focal length increases, from 18mm to 35mm, on the lens above, the aperture diameter becomes smaller, reducing the f-stop from f/3.5 to f/4.5.
To capture the same amount of light from the scene, as the focal length increases, the shutter speed would also have to become longer.
The “faster” the lens, the lower the f-stop value it can maintain over its entire focal length range.
Lens Speed Example
Looking at the 14-24mm f/2.8 wide-angle lens above, there is a single minimum f-stop value given of 1:2.8.
This means that this lens can maintain f/2.8 minimum f-stop value no matter the focal length.
Lenses like this are much more expensive because they require more glass and better engineering to produce.
There is also a maximum f-stop value for each lens, but it’s not listed since it doesn’t change the “speed” or how fast the lens can expose for a given scene.
Exposure Stops & Depth of Field
An exposure stop, or stop for short, is a scale to measure the change in light, exposed to the image sensor, due to different exposure settings such as f-stop and shutter speed.
For ISO, exposure stops provide the increase or decrease in signal (light information) amplification, thus how much light is required to produce the optimal exposure.
Stops provide an easy way to balance the exposure triangle while changing settings.
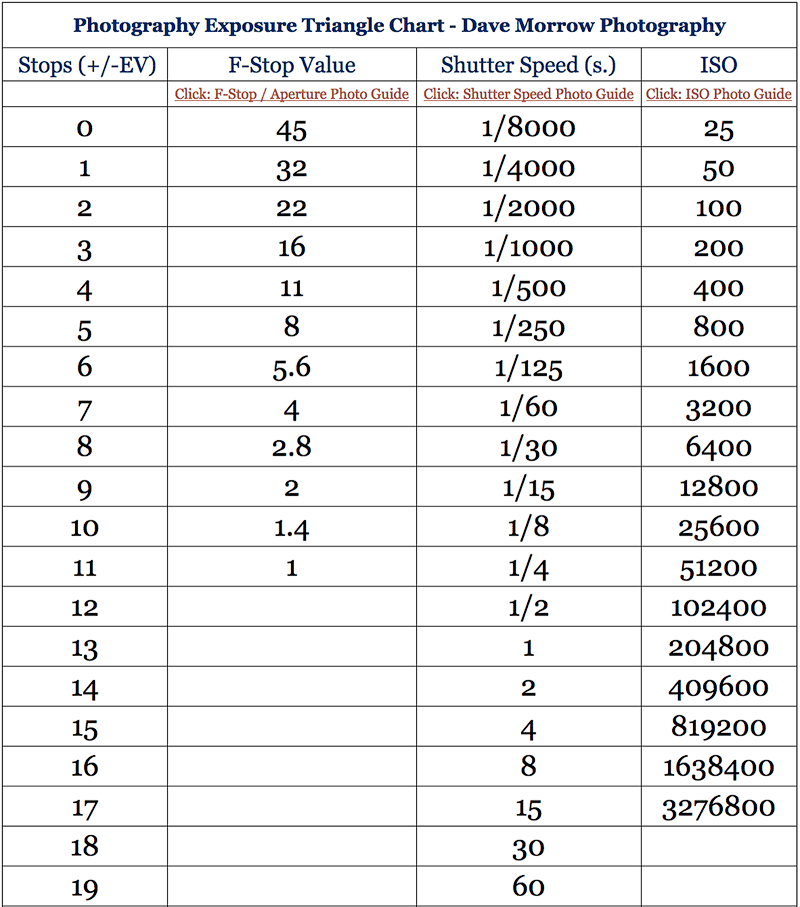 Click Here & Download the chart as a PDF to reference while reading.
The Stops Column shows the difference in stops between different f-stop values.
The F-Stop Value Column shows different standard f-stops in 1 stop intervals.
Each change in stops doesn’t correlate to a specific f-stop value.
Stops show you how much light is captured from one f-stop setting to the next.
This makes it easy to maintain the correct exposure when changing settings.f
Increasing the f-stop, thus producing a smaller aperture diameter, forces the image sensor to collect less light information, producing a darker image, with increased depth of field.
By increasing the f-stop value, the aperture diameter gets smaller.
Doing so produces an increased depth of field, and a darker image if no other settings are changed.
This is known as stopping down.
Decreasing the f-stop, thus producing a larger aperture diameter, allows the image sensor to collect more light information, producing a brighter image, with a decreased depth of field.
By decreasing the f-stop settings the aperture diameter gets bigger.
Doing so produces a decreased depth of field, and the image gets brighter if no other settings are changed.
This is known as stopping up.
Depth of Field & Exposure Stop Examples
In the following examples, ISO and shutter speed are constant.
Only f-stop changes in 1 stop increments.
The first example was taken at f/11, followed by f/8, f/5.6, and f/4.
The focal point stays the same for each of the images.
As the f-stop becomes smaller, by 1 stop at a time, the image gets brighter, but the depth of field decreases.
Notice how the sharpness in the bottom of each image drops off as the f-stop decreases.
This shows the depth of field becoming smaller and smaller.
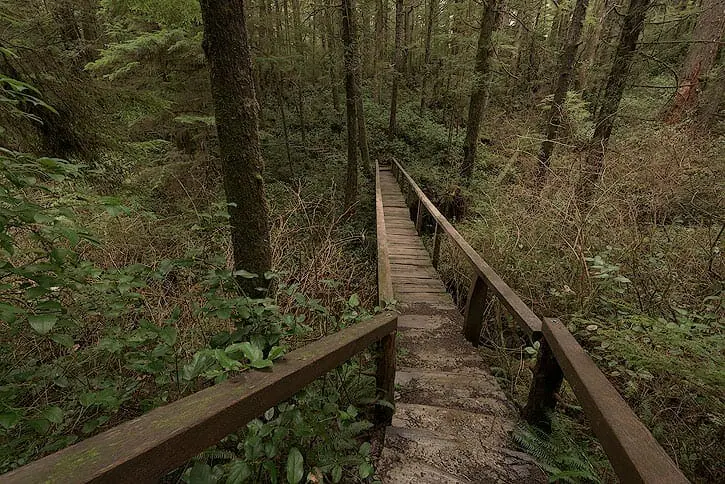
Settings: f/11, ISO100, 1/5th second
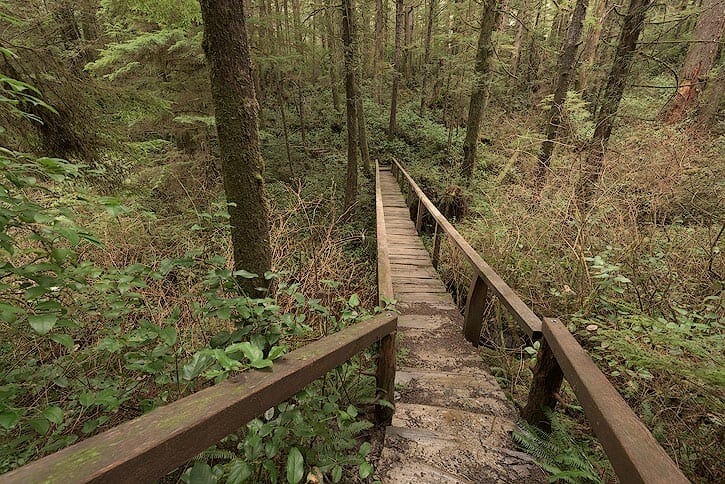
Settings: f/8, ISO100, 1/5th second
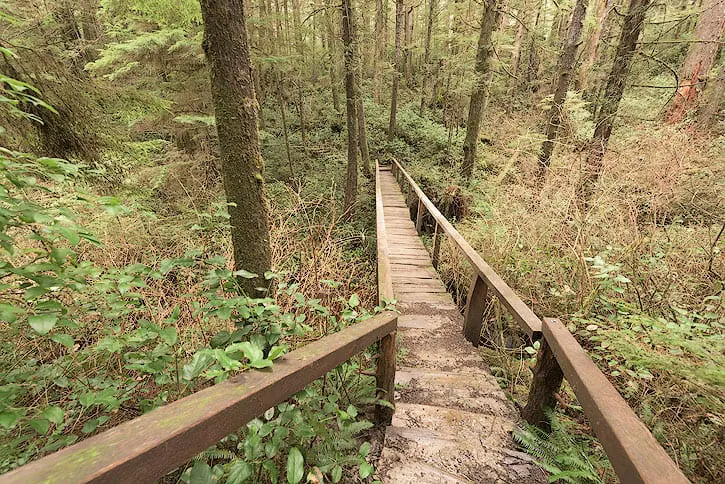
Settings: f/5.6, ISO100, 1/5th second

Settings: f/4, ISO100, 1/5th second
If you wanted to maintain constant exposure (image brightness), while changing the f-stop values, then changes in ISO or shutter speed would have to be made in the opposite direction.
Exposure Stops & Aperture Diameter Example
The amount of light exposed to the image sensor is determined by the square area of the aperture as seen in the graphic below.
Aperture Area = Pi*(Aperture Radius^2)

For example, Shooting at an f-stop of f/1.4 provides a 314 square millimeter opening for light to enter the lens as seen in the Aperture Area Column.
Shooting at f/2.8 and 28mm provides a 79 square millimeter aperture area.
If you changed from f/2.8 to f/5.6, this reduces the area by half, thus reducing the amount of light in the exposure by half.
Using exposure stops keeps you from having to do these calculations each time!
Shooting Example – Aperture & Exposure Stops
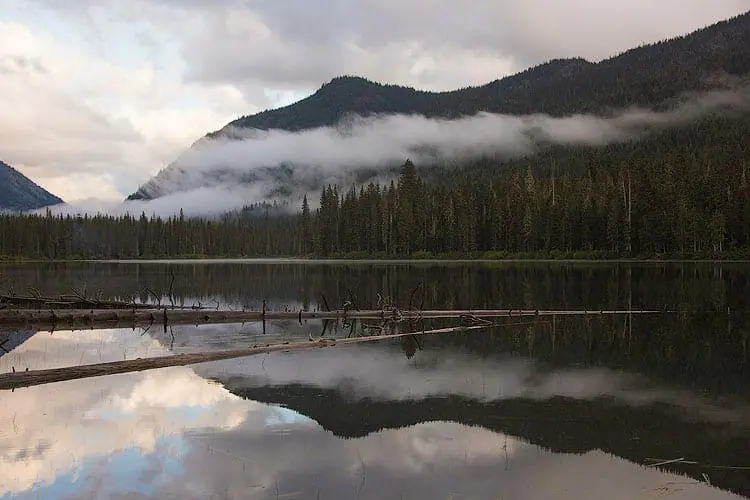
Imagine taking an image at f/16 and thinking that it was way too dark.

Taken at f/16
Next, you thought, “If this picture was 2 times as bright it would be perfect.”.
Changing the settings by one stop, from f/16 to f/11 would provide double the amount of light.
Instead of having to guess you just reference the exposure stops chart and made the change.
Taken at f/11
Example Photos & Camera Settings
Depth of Field is controlled by three factors, each shown with example photos below.
Focal Point & Depth of Field
The focus point or focal point controls the location of the focal range within the image.
I prefer to control this focus point manually, using back button focus.
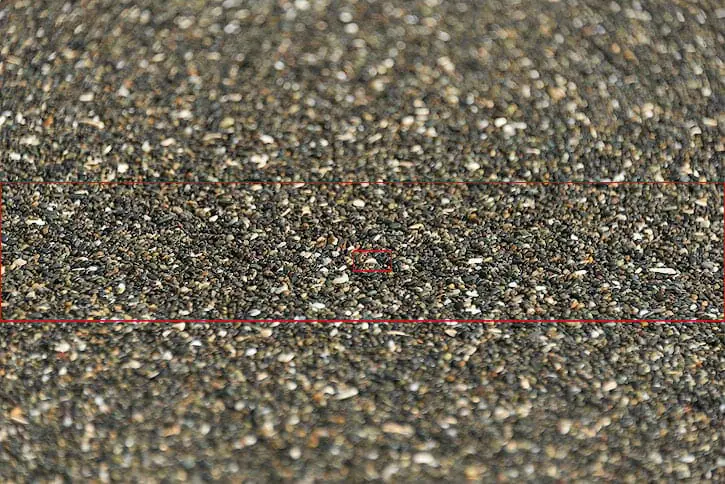
Each image below was captured at f/5.6.
The focus point moves, but all other settings stay the same.
The focal range is denoted by horizontal red lines.
The red box denotes the focus point.
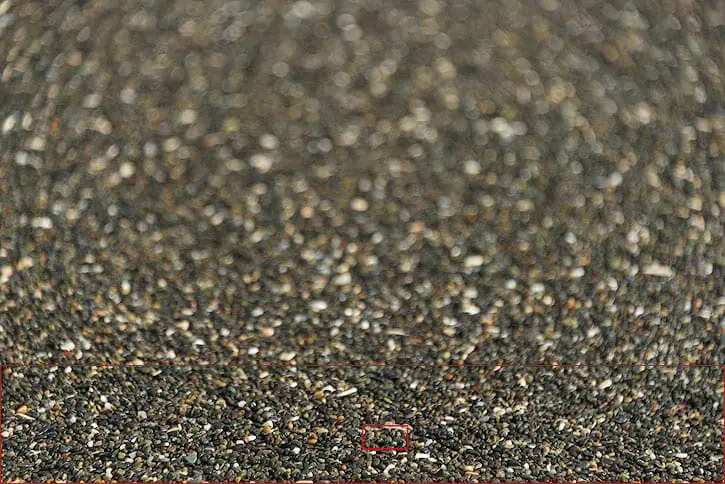
In the following image, all settings remain the same.
The focus point moves to the middle of the image, shifting the focal range.
The focal point is shifted to the back of the image, below, moving the focal range with it.
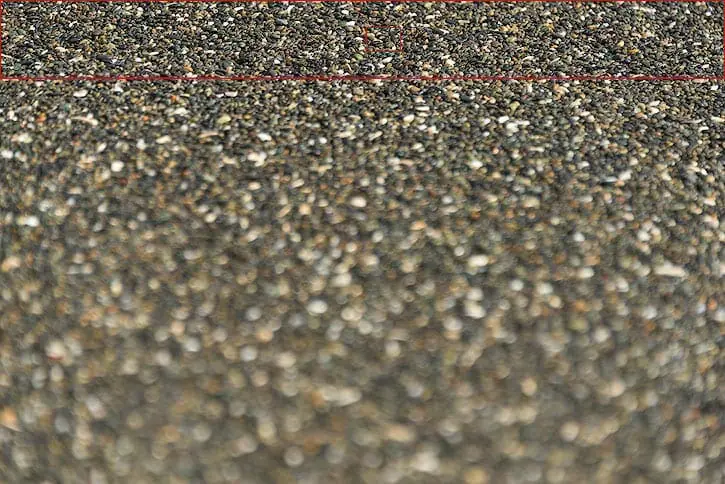
By selecting the correct focal point location and f-stop settings, the photographer controls the depth of field for each image.
F-Stop & Depth of Field
The following examples show different image attributes correlate to varying f-stop values and depth of field.
An image attribute is a specific visual effect obtained from varying camera settings such as f-stop, ISO & shutter speed.
In this case, we will look at visual image attributes determined by f-stop, providing varying depths of field.
- As the f-stop value increases, the aperture diameter decreases, allowing less light into the camera while increasing the depth of field.
- As the f-stop value decreases, the aperture diameter increases, allowing more light into the camera while decreasing the depth of field.
Small F-Stop Values & Image Attributes
The following image has a very shallow depth of field, taken at f/1.4.
When isolating a subject this is a great setting to use.
Using this f-stop during the day requires a very fast shutter speed making it great for action shots.

Taken at f/1.4
Shooting at slightly larger f-stop values such as f/2.8 provides the same effect with a slightly larger depth of field, as shown in the following example.
Increasing to f/2.8 the same effect can be seen, but the depth of field starts to increase.
Shooting at f/2.8 is my favorite setting for star photography.

Taken at f/2.8
Shooting at f/4 or f/5.6 can be great for action shots where there is a subject and some interesting detail in the background.
The following image is in sharp focus for the person, but slightly out of focus for the background.
This still allows you to see the background, but it’s not the center of attention.
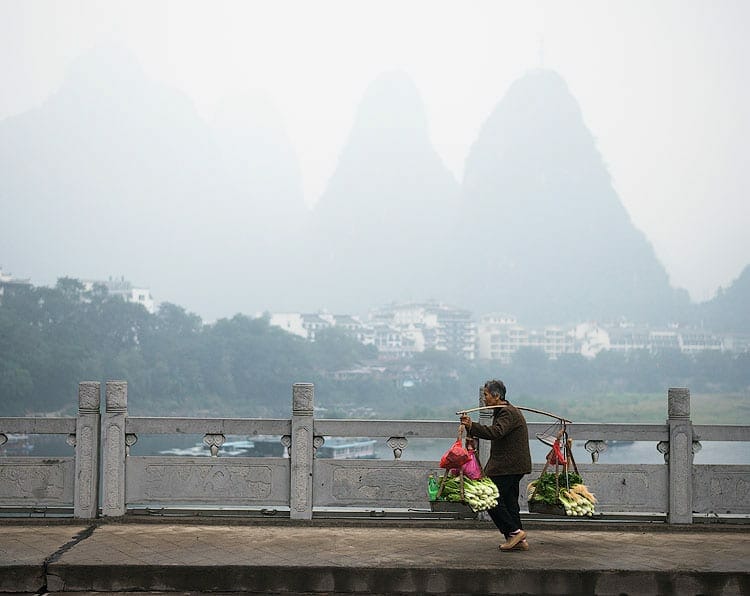
Taken at f/5.6
Mid-Range F-Stop Values & Image Attributes
F-stop values of f/8 to f/11 are ideal for landscape photography.
They provide a sharp focus from foreground to background.
I shoot at these settings for 99% of my landscape photos.
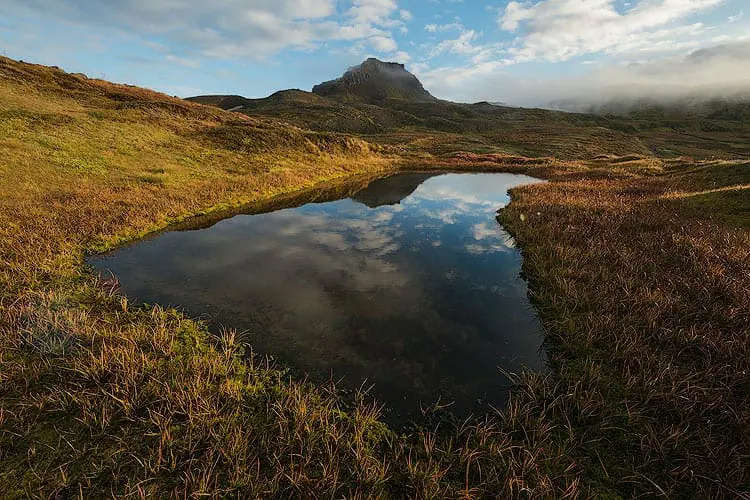
Taken at f/11
Large F-Stop Values & Image Attributes
Sometimes it’s required to shoot at f/16 or f/22 to increase the shutter speed for long exposures or to increase the depth of field for very distant scenes.
By shooting at f/16 the amount of light entering the lens is reduced, requiring a longer shutter speed.
This is great for long exposures at sunrise and sunset.
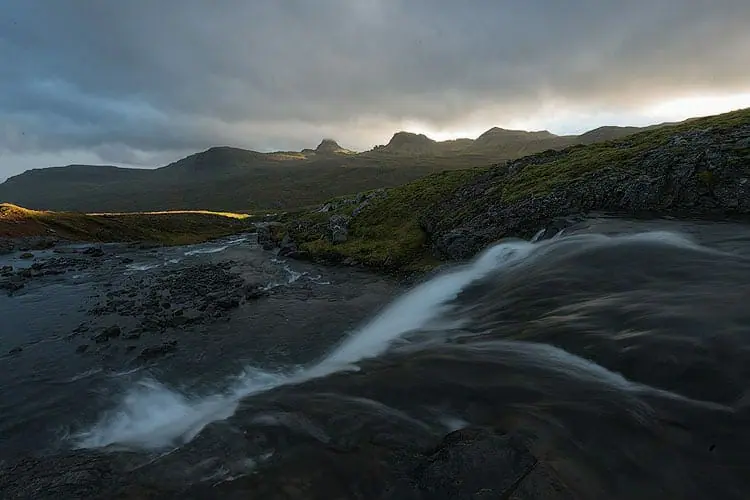
Taken at f/16
Shooting at f/22 degrades image quality due to lens diffraction but provides a sun star due to the optics of the lens.
I only recommend shooting at f/22 when you want the sun star effect.
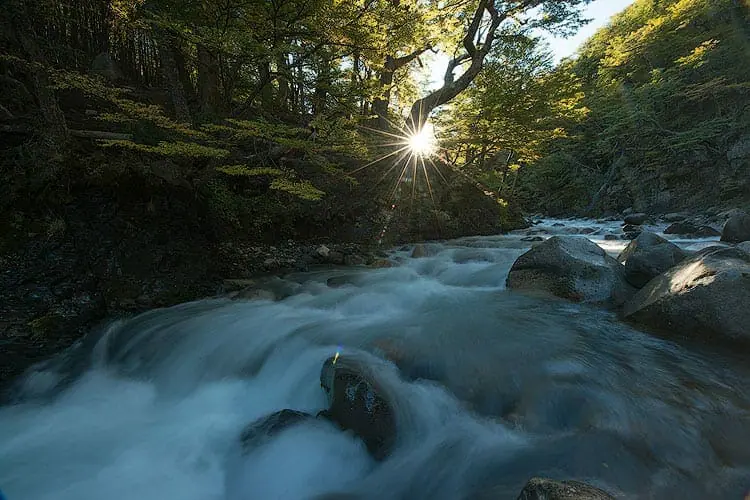
Taken at f/22
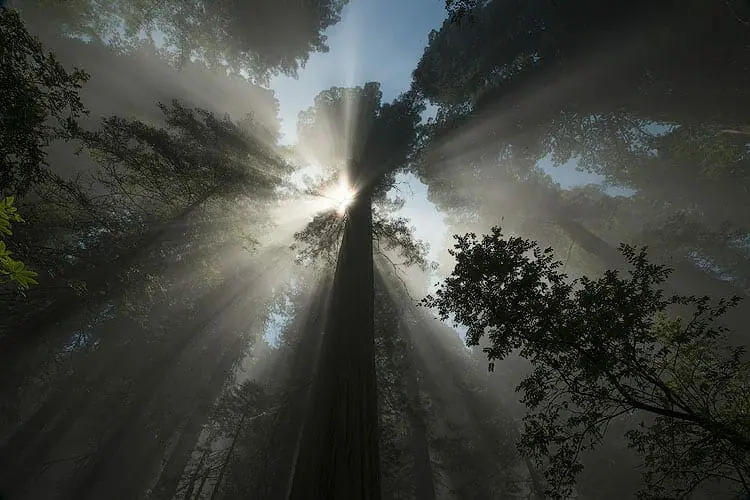
Taken at f/22
Focal Length & Depth of Field
When the focal length gets larger, the scene becomes more magnified.
This causes the depth of field to decrease.
The opposite also is true when the focal length decreases.
- When shooting at 10mm all the way to 100mm it’s almost impossible to see these changes.
- When you start shooting in the 100mm or greater range, then these effects start to become very apparent.
To compensate for these decreases in DOF the photographer can increase f-stop values or use methods such as focus stacking.
Example Photos: Depth of Field Vs. Focal Length
The first example below shows an image taken at f/9 & 145mm effective focal length.
Even at f/9 the background is out of focus.
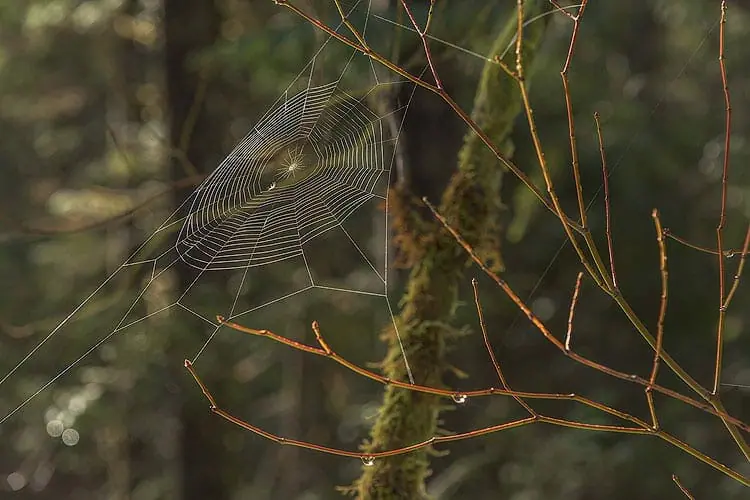
Due to the increased focal length, the depth of field decreased.
If this image was taken at 50mm instead of 145mm, f/9 would have provided sharp focus over the entire depth of field.
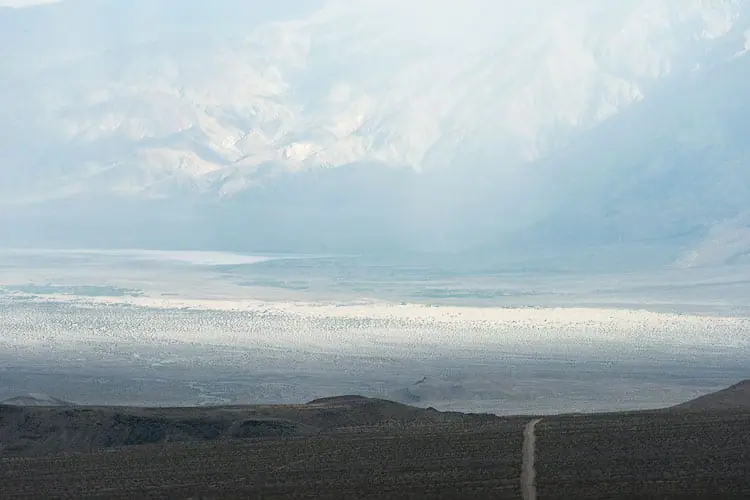
The next example shows an image taken at f/11 and 250mm effective focal length.
At first glance, it may appear to be focused throughout the entire depth of field.
Looking at the bottom-righthand corner, the image sharpness starts to degrade significantly.
This is due to the decreased depth of field from increased focal length.
To compensate for this issue the f-stop value could be increased to f/16, slightly extending the depth of field.
Selecting the Correct F-Stop & Depth of Field
All of the information above provides the foundation for selecting the best camera settings using the Photography Exposure Triangle.
To correctly select the best f-stop and depth of field a firm understanding in shutter speed & ISO are required.
First learn the main 3 settings, f-stop, shutter speed, and ISO.
Then continue on to the Photography Exposure Triangle Guide, for complete details on combining all of the settings.
How to 10X Your Learning Speed
The best way to improve quickly is by learning firsthand from someone that’s optimized their skills, over a decade or more through trial and error.
You can’t read blogs and watch internet videos to do this.
I offer workshops & tours for all skill, fitness, and age levels.
Over a 3-day weekend, I can teach you everything I know, plus provide 1 on 1 feedback that will quickly improve your skills.
I’ve seen students learn more in a 3-day trip than they have in 20 years of trying to learn on their own.
Check out my workshops & tours, right here.
